Ever found yourself wanting to make your Mailchimp surveys pop, to truly capture your audience’s attention beyond just plain text questions? Imagine being able to show your customers a new product feature, a quick tutorial, or even a heartfelt testimonial right within the survey itself. It sounds like a game-changer for engagement, moving beyond the static experience to something dynamic and interactive.
Video is an incredibly powerful tool for communication, capable of conveying emotion, information, and connection far more effectively than words alone. While Mailchimp’s native survey builder might not have an obvious “insert video” button, there are clever ways to bypass this and successfully integrate video content. This guide will walk you through the process of how to embed video in Mailchimp survey template, ensuring your respondents are more engaged and your data collection is richer.
Why Video Elevates Your Survey Engagement and How to Prepare
Incorporating video into your surveys isn’t just a fancy trick; it’s a strategic move that significantly boosts engagement and comprehension. A short video at the beginning of a survey can set the tone, introduce the survey’s purpose, or even offer a quick thank you. Explainer videos can clarify complex questions, ensuring respondents understand what’s being asked, leading to more accurate and insightful data. Testimonial videos can build trust and encourage participation, showing real people benefiting from your product or service.
The challenge, however, is that Mailchimp’s survey builder is designed primarily for text-based questions and basic imagery. It doesn’t natively support direct video uploads or embedding from popular platforms with a simple click. This means we can’t just upload a video file directly into the survey editor. Instead, we need a workaround that leverages the power of external video hosting platforms and Mailchimp’s flexibility with custom code blocks.
Before we dive into the technical steps, it’s crucial to understand that the video must be hosted somewhere online, like YouTube or Vimeo. These platforms provide an “embed code” that acts like a window into your video, allowing it to play on other websites, including your Mailchimp survey. This method ensures your survey loads quickly, as the video itself is streamed from the hosting platform, not directly from Mailchimp’s servers.
Thinking ahead about your video content and where it lives is the first step in this process. Having your video ready and accessible on a reliable hosting platform will make the embedding process smooth and efficient. It’s also important to consider the video’s purpose within the survey, as this will influence its placement and overall impact.
Preparing Your Video for Embedding
- Ensure your video is finalized and edited. Check for clear audio, good lighting, and conciseness to maintain respondent attention.
- Upload your video to a reputable video hosting platform. YouTube and Vimeo are excellent choices, offering reliable streaming and embed code generation.
- Adjust privacy settings as needed. If the video is for a specific audience and not public, ensure it’s set to “unlisted” or “private” with appropriate sharing permissions.
- Familiarize yourself with the “share” or “embed” option on your chosen hosting platform, as this is where you’ll retrieve the necessary code.
A Step-by-Step Guide to Effectively Embed Video in Mailchimp Survey Template
Now that your video is ready and hosted, it’s time to bring it into your Mailchimp survey. The core of this process involves using the custom code block feature within Mailchimp’s survey builder. This block allows you to insert HTML code, which is precisely what the video embed code from YouTube or Vimeo is.
First, navigate to your video on YouTube or Vimeo. Below the video player, you’ll typically find a “Share” button. Clicking this will reveal various sharing options, one of which is “Embed.” Select this option, and you’ll see a snippet of HTML code. This code contains all the instructions needed for a webpage to display and play your video. Copy this entire code snippet; it’s the key to making your video appear in the survey.
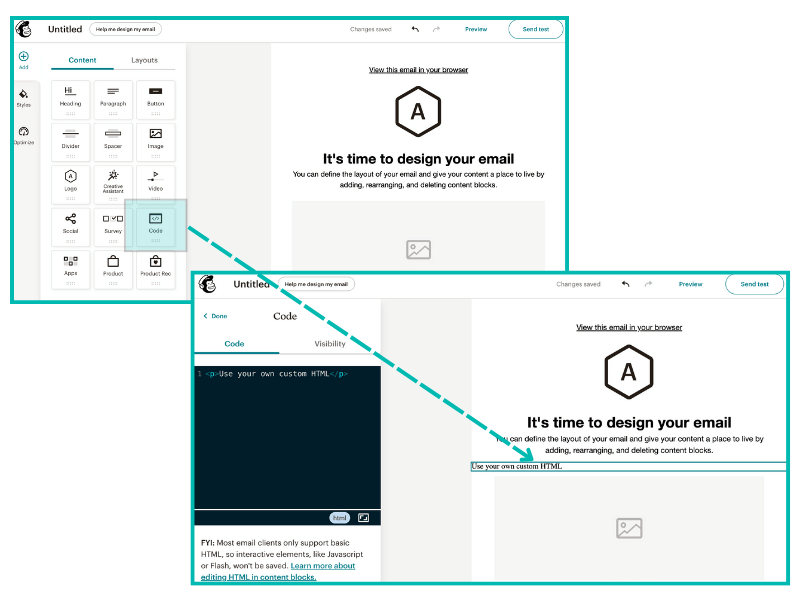
Next, log in to your Mailchimp account and go to your Surveys section. Either create a new survey or select an existing one you wish to edit. Within the survey builder interface, you’ll see various content blocks you can drag and drop onto your survey. Look for the “Code” block. This is often found under the “Content” tab or similar section. Drag this block to where you want your video to appear in the survey, whether it’s at the very beginning, before a specific question, or even at the end as a thank-you message.
Once you’ve placed the “Code” block, click on it to open its editing panel. You’ll see a text area where you can paste your HTML code. Carefully paste the entire embed code you copied from YouTube or Vimeo into this area. Mailchimp will usually render a preview of the video within the editor, giving you a good idea of how it will look to your respondents. Always remember to save your changes after pasting the code.
Before launching your survey, it’s absolutely crucial to test it thoroughly. Send yourself a preview email or use the “Open Survey” link to view it in a live browser environment. Check if the video plays correctly, if it’s responsive on different screen sizes (desktop, tablet, mobile), and if its placement feels natural within the survey flow. Sometimes, minor adjustments to the width and height parameters within the embed code might be necessary to optimize its appearance, although most modern embed codes are responsive by default.
- Get the embed code from your video hosting platform (e.g., YouTube’s “Share” then “Embed” option).
- In Mailchimp, open your survey for editing.
- Drag a “Code” content block to the desired position in your survey.
- Paste the copied video embed code into the code block’s editing area.
- Test the survey thoroughly on various devices before publishing to ensure the video plays correctly and looks good.
By following these steps, you transform a standard Mailchimp survey into an interactive and engaging experience. The ability to embed video in Mailchimp survey template empowers you to provide clearer instructions, showcase content, and connect with your audience on a deeper, more personal level. This enhanced engagement can lead to higher completion rates and more valuable feedback, making your data collection efforts far more effective.
Don’t let the technical hurdle deter you from harnessing the power of video in your surveys. With a little setup and a solid understanding of Mailchimp’s custom code blocks, you can create surveys that not only collect data but also captivate and inform your audience. Experiment with different video placements and content types to see what resonates best with your specific respondents, continuously optimizing for the best possible survey experience.


